DSN Aperture Fee Calculator Help Page
ABOUT
This tool replaces the Excel DSN Aperture Fee Calculator.
Useful Links:
DSN Commitments OfficeProposal Preparation
NASA's Mission Operations and Communications Services (for Costing Information, go to page 13)
TUTORIAL
Overview
It is recommended that work in the order that the sections are displayed and that you complete each section before moving onto the next as there are some dependencies between the sections
- Create Service Aliases First
- Define the required service configurations that the mission will be using
- Service aliases are required in order to create requirement requests
- Create Mission Events
- Define time intervals of key mission events/phases
- Events are required in order to define requirement requests
- Create Requirement Requests
- Use the mission phases defined and the service aliases created to build each requirement request
- Compute Scenario
- Export and Share
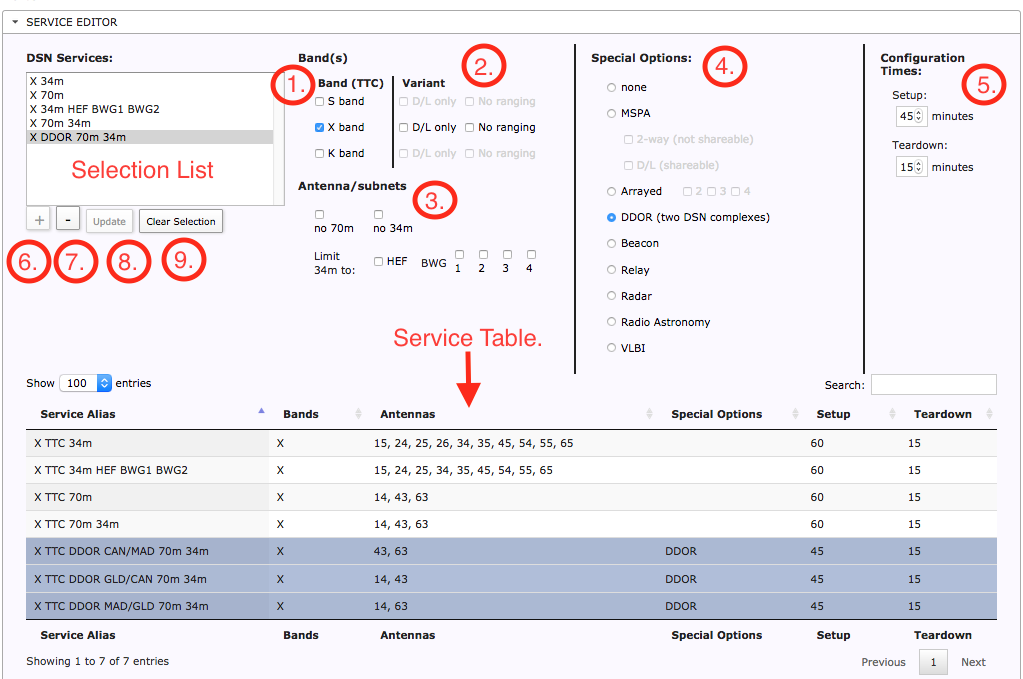
Setting Up Services
Expand the Service Editor to create your services
- Select Band (required)
- S, X and/or K - at most 2
- Select Variant
- D/L only or
- No Ranging
- Antenna/subnets
- Default is 34m
- Choose subnet if needed:
- HEF, BWG1, BWG2, BWG3 or BWG4
- Special options - on type of service
- DDOR generates 3 service alias (for each complex pair)
- Configuration Times – automatically fills to default, but can be changed for unique requirements
- Use the “+” to add service once all options are selected - gets added to the selection list and the table
- Use the “-” to delete the selected service
- Use the “Update” button to edit
- Select service from list
- Modify options
- Click on "Update"
- See changes in the list and table
- “Clear selection” reverts all options to default
Understanding the Table
- All alias definitions show up in the table once created/modified
- First Column: Service Alias lists the name of service that you can assign to requirements when generating requests
- Antennas are generated based on the options you choose (band, subnet, etc.)
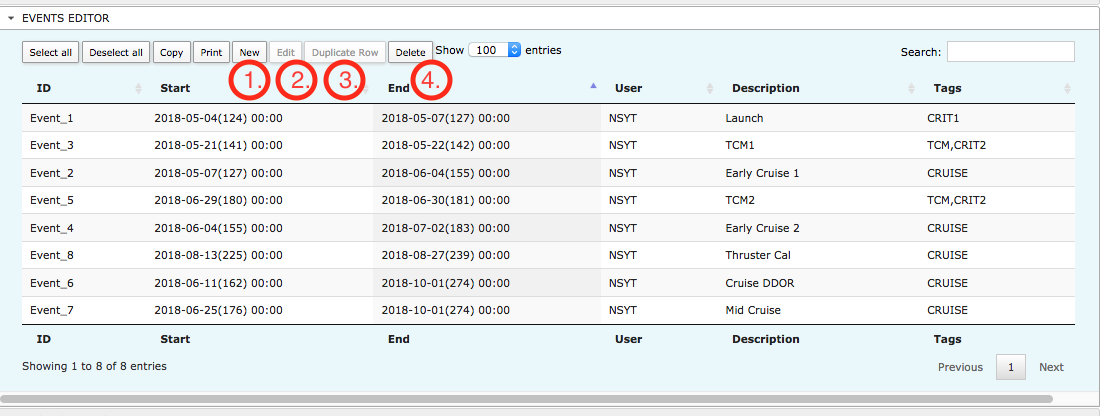
Creating Events
Expand the Event Editor to create your mission events
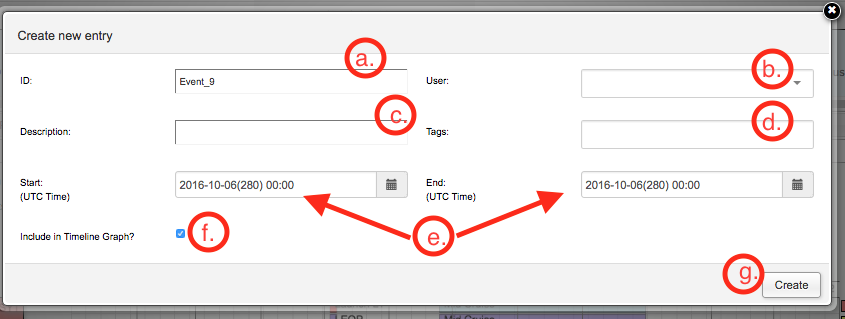
- Create New Event
- Auto-generated unique ID
- User (Mission/Spacecraft) Name
- Event Description Text
- Tags - type of event, criticality, etc.
- Start & End Time in UTC
- Include in Timeline - select if you want to display event in the Gantt chart in the Timeline section
- Create - adds new row to the table
- Edit Existing Event - opens editor to modify the event information for the selected row
- Duplicate Row - opens editor to modify the selected events' information and assigns new ID for a new event
- Delete Event - deletes selected row
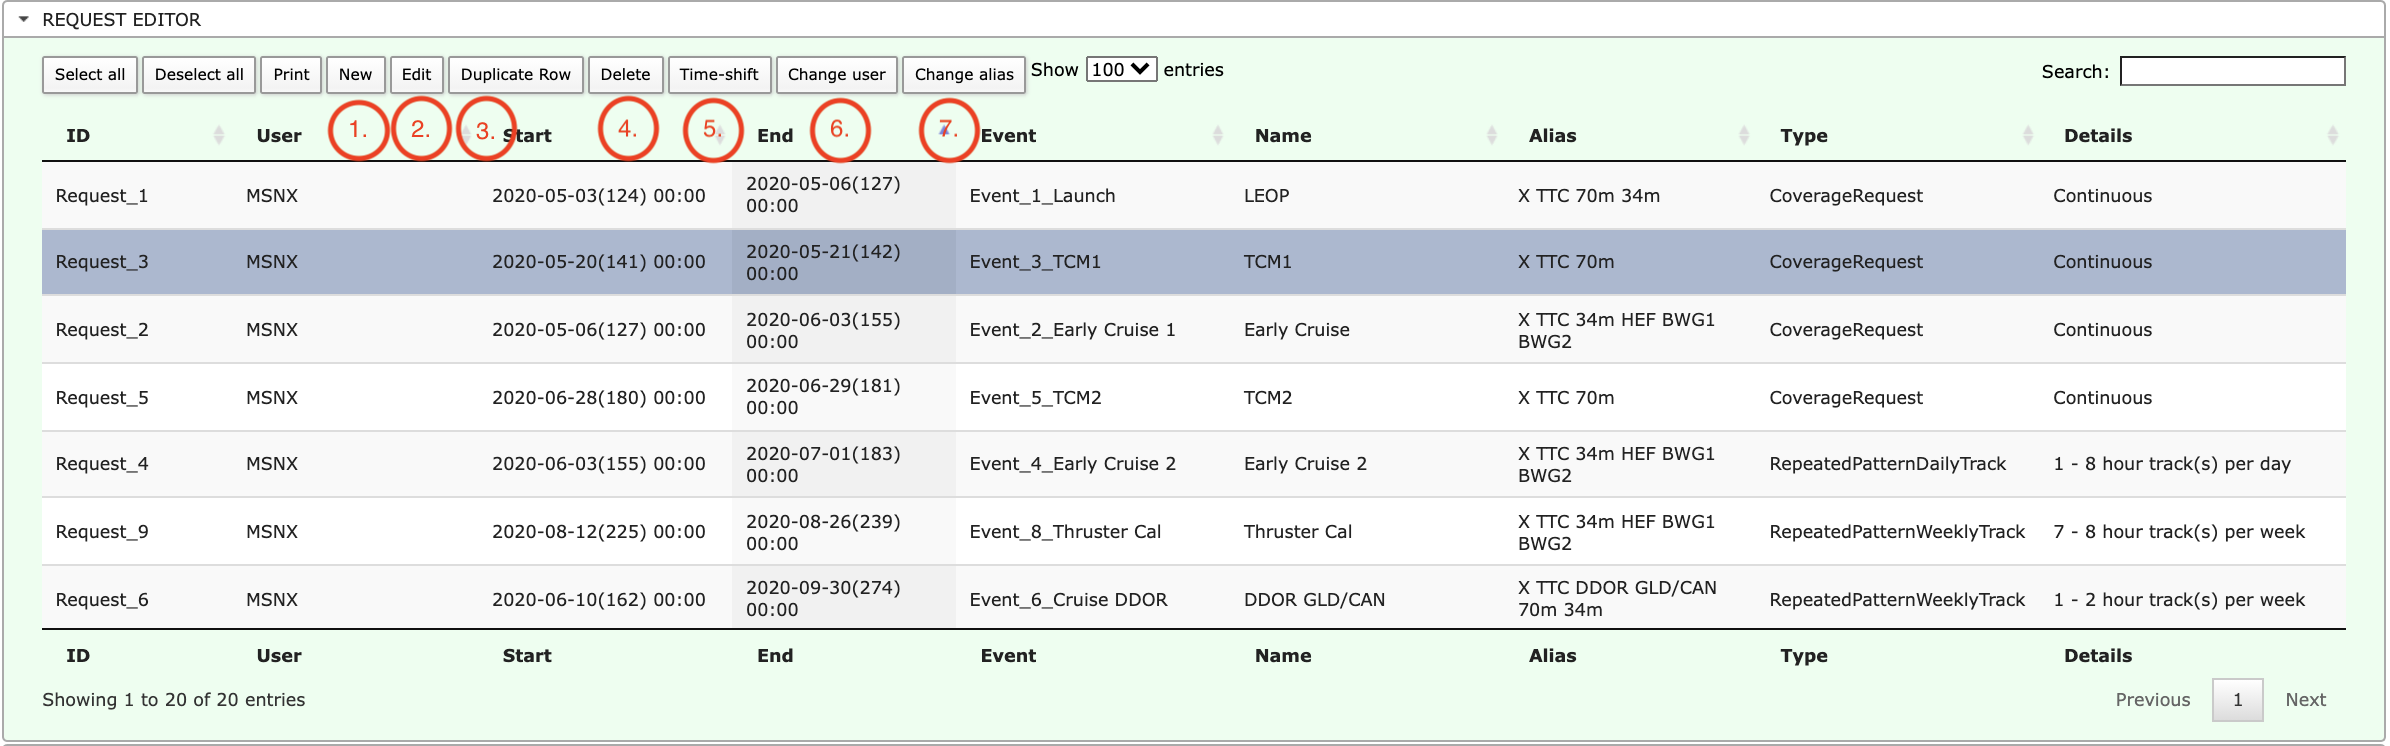
Creating Requests/Requirements
Expand the Request Editor to create your requests
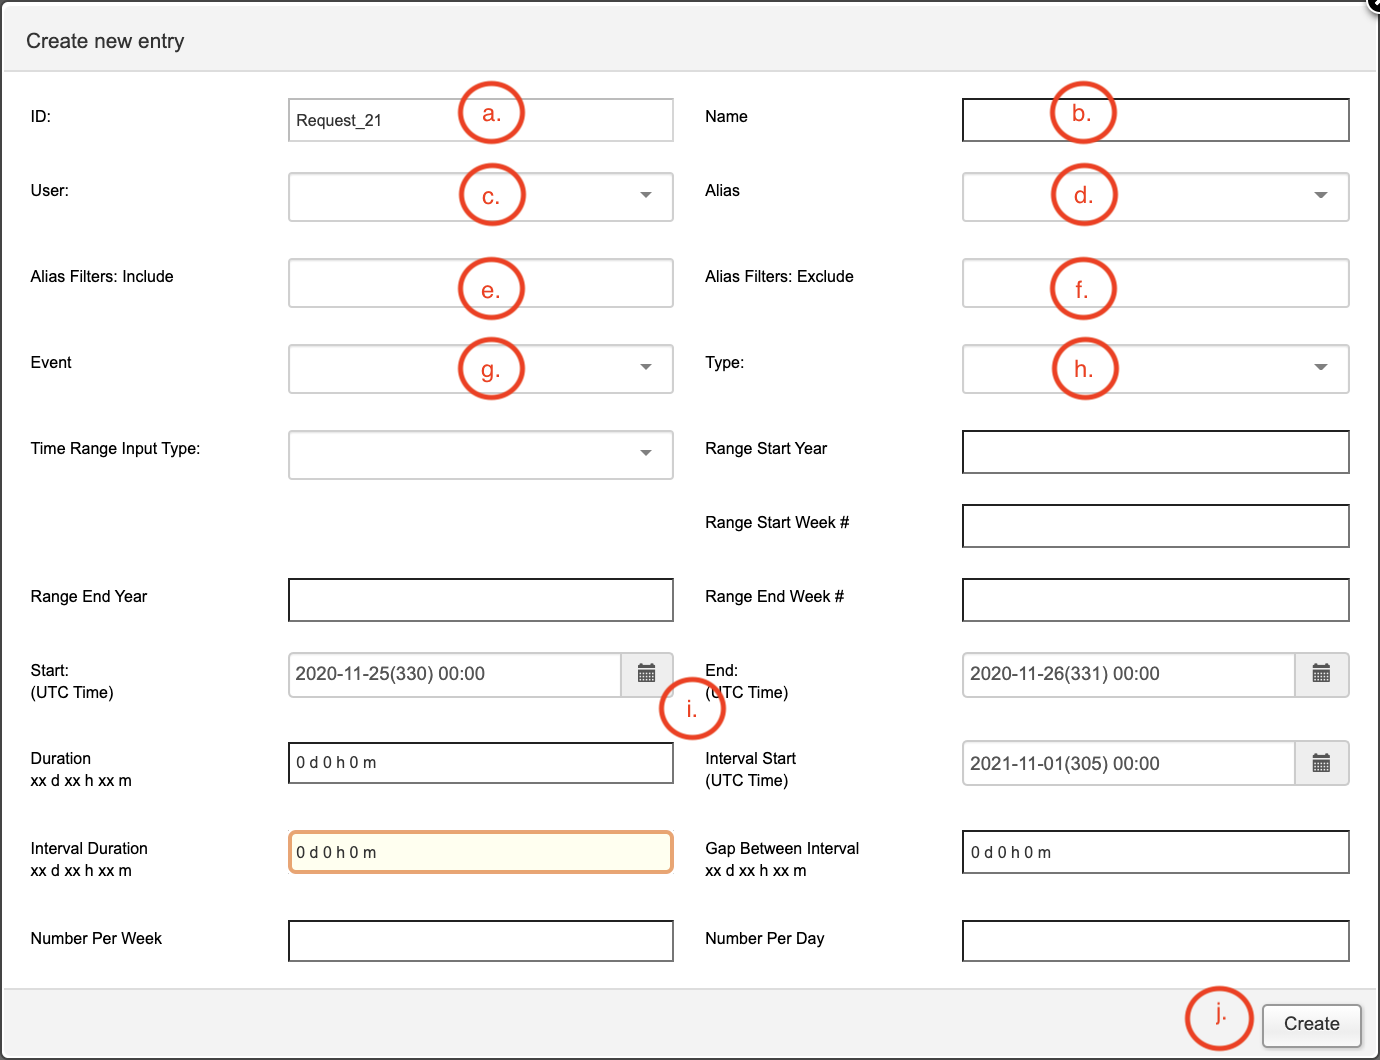
- Create New Request
- Auto-generated unique ID
- Request Name
- User (Mission/Spacecraft) Name
- Service Alias (options from the above generated services)
- Alias Filters: Include - alias must be included
- Alias Filters: Exclude - alias must be excluded
- Event - Associated event for the request - uses the start/end time of the event
- Type - required - based on type, remaining fields will vary
- Coverage Request - spans full range of chosen event or start/end range
- Planning Request Single
- Must Specify Request Duration
- Fits one request of specified duration into chosen time range
- Repeated Pattern Daily Track
- Must Specify Number of Tracks per Day
- Fits requested number of tracks per day in the chosen time range
- Repeated Pattern Weekly Track
- Must Specify Number of Tracks per Week
- Fits requested number of tracks per week in the chosen time range
- Repeated Pattern Regular Interval Track
- Must Specify Event Duration
- Must Specify Event Gap
- Fits as many tracks as fits in the chosen time range based on event duration and event separation (gap)
- Start & End Time in UTC - only need to specify if associated event not chosen
- Create - adds new row to the table
- Edit Existing Request - opens editor to modify the request information for the selected row
- Duplicate Row - opens editor to modify the selected requests' information and assigns new ID for a new event
- Delete Request - deletes selected row
- Time-shift - shifts time on row selected and dependencies if exists
- Change user - change user on row(s) selected and dependencies if exists
- Change alias - change alias on row(s) selected and dependencies if exists
Generating Aperture Fee and ULP Results
Use the "Compute Scenario" Button to generate results and the ULP Tab and Aperture Fee Results Tab will enable

ULP Tab
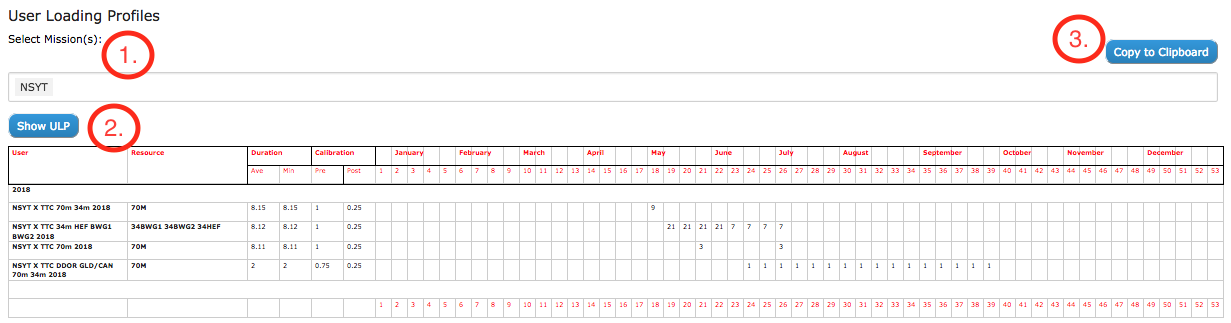
- Dropdown to select mission(s) to display (If only one mission in list then it is auto-populated)
- Refreshes ULP table when mission selection changes
- Copy to Clipboard - to paste in Excel or Word
Aperture Fee Results Tab
If there is only one mission in your created scenario, the aperture fee will be calculated with default options shown below, if not, options must be selected. To change options, there is a Change Aperture Fee Options button on the results page
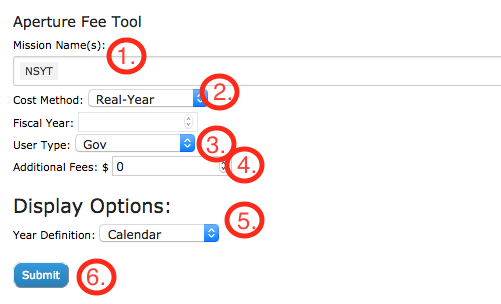
- Mission Name(s) - select one or more missions to compute aperture fee
- Cost Method
- Real-Year (default) - costs for years following are automatically inflated at the official NASA Headquarters rate
- Fiscal-Year - If chosen, Must specify a Fiscal Year - All costs will be calculated using the chosen years inflation rate
- User Type (required)
- Government - NASA Funded or NASA Cooperative Mission
- Government-Reimbursable - United States funded missions which is not the responsibility of NASA
- Non-Government-Reimbursable - Commercial or non-U.S. sponsored missions for which the DSN must be reimbursed for support
- Additional Fees - Lump value to add to total computed cost
- Display Options: When generating summary of data, group by fiscal year or calendar year
- Submit - generate Aperture Fee Results
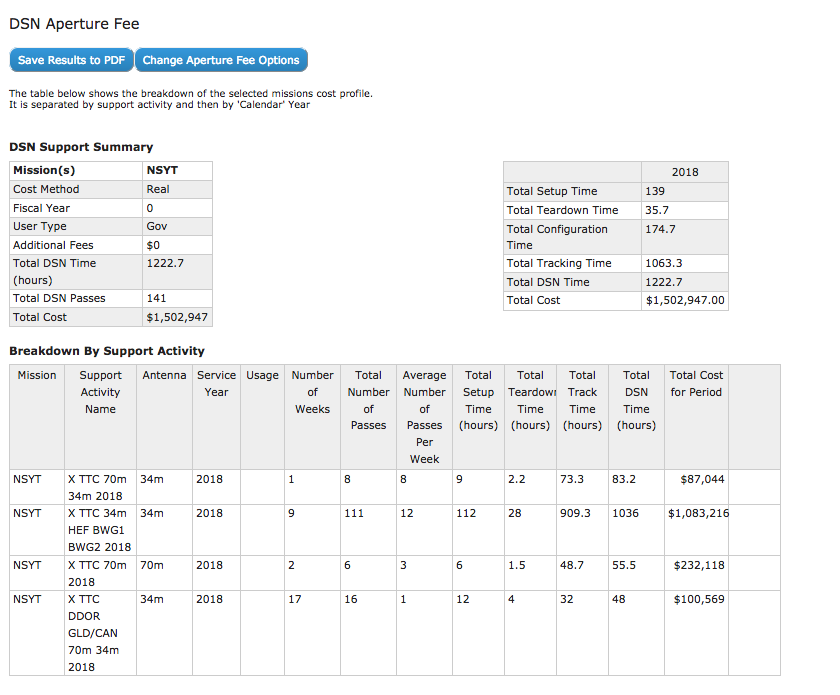
Sample Results - shows a variety of graphs and tables with summaries of the requests and cost breakdown
Save Result to PDF - opens print dialog to send result page to PDF file
Importing, Exporting and Sharing

Exporting and Sharing
- Enter Enter Scenario Name
- Click on Export Scenario
Once exported, you will have a file named with your scenario name and the ".apfee" extension in you downloads folder. Email and Share this file with others
Importing
- Select the Import Scenario button
- Find the ".apfee" file you wish to load in the file browser
- Once loaded, you can re-generate the ULP and Aperture Fee Results by clicking Compute Scenario
* Note: Scenarios will not be saved internal to this web tool. Any data not saved to a .apfee fill will be lost. Only input information (data from the Editor tab) is exported to the .apfee file. Results can be regenerated at anytime using these inputs.